If you've ever wanted to turn a simple photo into a fully animated 3D object you can embed into a website… it’s now stupidly easy. Honestly, it still blows my mind.
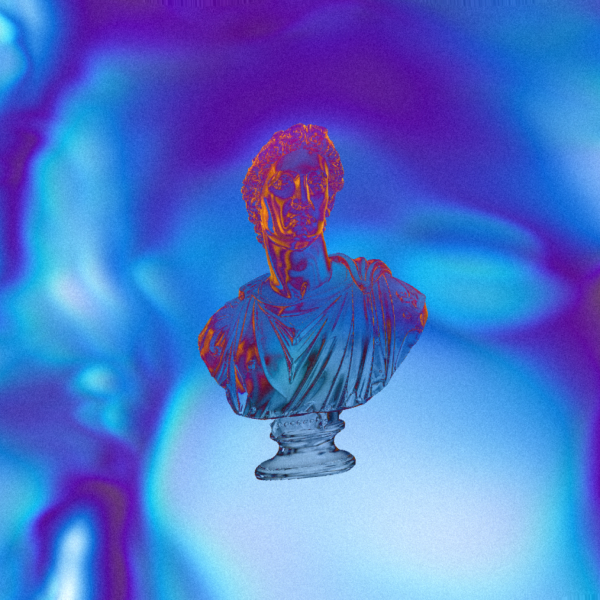
In this tutorial, I’ll walk you through exactly how I took a picture of Paddy → turned it into a 3D model using Meshy AI → refined it in Spline → and animated it inside Webflow.
It’s wild what you can do with just a single image now.
Let’s get into it.
What Is Meshy AI (and Why It’s Insane)?
Meshy AI is one of the most impressive tools I’ve used for 3D workflows. If you use Spline, Blender or anything similar, this tool will make you feel like you’re living in the future.
With Meshy, you can:
- create a 3D object from an image
- generate a 3D model from a text prompt
- convert a 3D model into an animation
- generate 3D videos
- customise lighting, textures, materials and HDRI scenes
The community page alone is ridiculous — people are creating everything from creatures to products to entire characters, straight from text prompts or uploaded photos.
If you're brand-new to 3D and want a beginner-friendly path, check out: How to learn 3D using Spline Tool: 3 Step Roadmap
Step 1: Uploading Your Image to Meshy AI
For Paddy, I used Meshy’s Image → 3D tool.
Before uploading, I quickly cut out the background using PickWish — highly recommend it if you want a clean silhouette and don’t want your 3D model picking up background noise.
Cutting the background helps Meshy understand what part of the image becomes geometry vs. what should be ignored.
Step 2: Adjusting Polygon Count
In Meshy, you can choose your polygon count:
- High poly (100k+) → more detail but massive file size
- Low poly (5k–20k) → loads way faster on the web
If you're embedding into Webflow or building a 3D website, always stay on the lighter side.
For deeper optimisation strategies, see: Optimizing Spline 3D Files for Fast-Loading Websites in Webflow and Framer
Step 3: Adding Textures in Meshy
One of the coolest parts of Meshy is how it wraps your original image around the 3D model.
Go to:
Texture → Upload your image
Then adjust:
- Roughness
- Metallic
- Lighting environment
- HDRI rotation
If you’re working with product visuals, glossy surfaces or reflective materials, these tutorials help a lot:
Spline Textures Tutorial: Matcap, Depth & Image Layers
3D Reflective Glass: Spline Tutorial For Beginners
Step 4: (Optional) Generating Character Animations
This is where Meshy gets borderline magical.
You can:
- upload a basic model
- choose an animation (walk, run, idle, etc.)
- export it as an FBX file
- import the FBX directly into Spline
Your model arrives fully animated. No rigging. No pain.
If you want to experiment with real character animation, check out: How To Make A 3D Model Tin
Step 5: Exporting the File for Spline
For Spline, the best export format is:
GLB
Why?
- includes geometry
- includes materials
- includes textures
- small file size
- works perfectly in Spline
If you want animation, export as FBX, but for static objects or Webflow-controlled animation, use GLB.
Before importing to Spline, run your file through a GLB compression tool.
A small file = a fast website.
If your assets still feel heavy: How to Make 3D Models Fully Responsive for Web & Mobile (Spline Tool)
Step 6: Importing the Model into Spline
Inside Spline:
- Click Import → GLB
- Drop in your Meshy export
- Wait for it to load
You’ll see:
- the texture
- the lighting
- the base material
- the wrapped image as the diffuse map
You can adjust lighting, HDRIs, reflections, shadows — whatever matches your style.
Want deeper control over Spline materials?
How To Achieve Realistic 3D Textures In Spline
Step 7: Exporting from Spline (Correct Settings Matter)
Go to:
Export → Viewer
Adjust these settings:
- Logo → Off
- Background color → Off (if using Webflow’s background instead)
- Page scroll → On
- Orbit/Pan/Zoom/Soft Orbit → Off
We want Webflow to control the animation, not Spline.
For a full breakdown of why these settings matter: An Introduction To Spline & Webflow: Unlocking The Power Of 3D
IMPORTANT: Click Update Viewer.
Step 8: Embedding Your Spline Scene in Webflow
Inside Webflow:
- Press CMD + K
- Search Spline Scene
- Paste your viewer URL
- Add it inside a full-screen fixed container
Your container should use:
- Position: Fixed
- Width: 100vw
- Height: 100vh
- Z-index: 0
Every content section above it should be:
- Position: Relative
- Z-index: 3
This ensures your Spline model sits behind everything but remains visible during scroll.
For a full walkthrough, see: How to Create a 3D Website Using Spline & Webflow
Step 9: Animate Your Model on Scroll Using Webflow
Inside Webflow Interactions:
- Choose While page is scrolling
- Add Spline animations
- Adjust rotation, scale, position
Example with Paddy:
- starts small (scale 0.5)
- grows larger on scroll
- spins from rotation 0 → 2
If you're new to scroll animations, start here: How to build a 3D website in 10 mins
When Should You Use Meshy vs Spline vs Blender?
Use Meshy AI for:
- people
- complex or organic shapes
- realistic texture wrapping
- quick 3D prototypes
- realistic models without modelling skills
Use Spline for:
- product shapes (cans, bottles, simple geometry)
- anything needing small file sizes
- interactive scenes
Learn why here: Spline 3D Tips: 3 Things Every Beginner Should Know
Final Thoughts
This workflow — Meshy AI → Spline → Webflow — is one of the fastest, easiest ways to bring fully custom 3D content into a real website.
Upload a photo → get a 3D model → refine it → animate it → publish it.
If you want to explore even more AI-powered 3D workflows: Exploring Spell: Spline’s Revolutionary AI-Powered 3D World Generator
%20(1).jpg)